What is Embossing? And how are they done?
Basically, Embossing and Debossing both involve two main things: a Die (Metal block), and a Stock (Paper stocks).
The Die is firstly being personalized accordingly to the image that you wish to Emboss or Deboss.
Using finishing machines, the Paper Stock is later being pressed like a stamp onto the Stock so it slightly raises the image (Emboss), or pushes the image (Deboss) on your prints.
Usually, this technique is used on logos, custom illustrations, or patterns to promote a luxurious impression on the packaging, business cards (tips: choose the right business card size too), tagging, etc. Learn more about Embossing or Debossing.
When applying Embossing or Debossing to your prints, it is actually not that you can do anything you wish on your prints. Here are the things that you should be aware of before you start your project.
Read More: What Sticker Material Types Should You Use?
General
Table of Contents
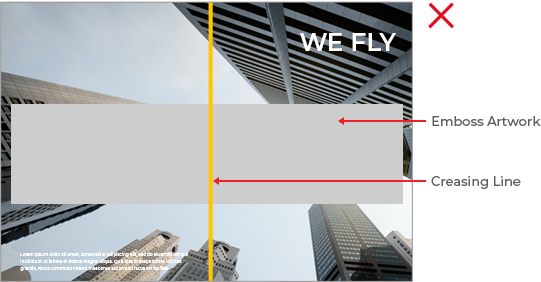
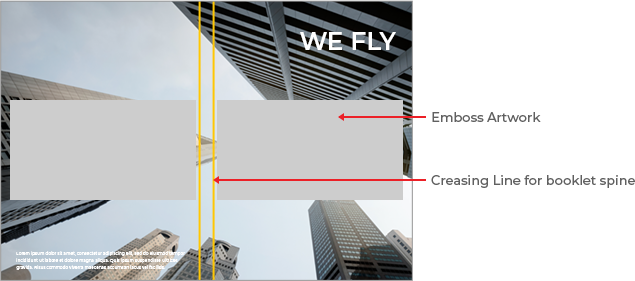
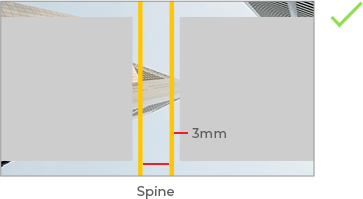
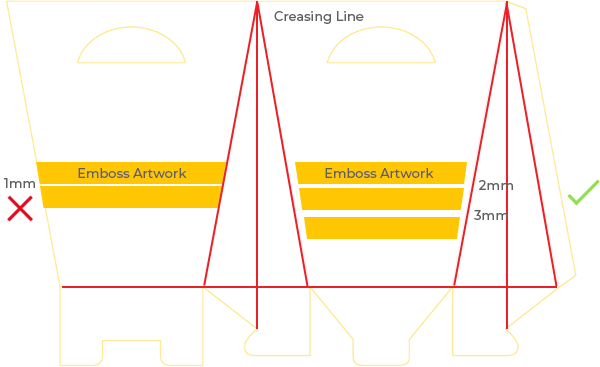
In general, Embossing is not applicable to Gluing areas such as book spines, packaging assembling, folding area, etc. Similarly, you are advised to keep at least a 4mm distance between your Embossing image and any creasing or folding line. It is also not applicable to Emboss on areas that are being Spot UV printed. Also, before finalizing your Embossing project, do not forget to double-check and make sure all your important elements such as texts, images, and logos, were being kept within the safe zone.
Below illustration demonstrates a wrong embossing example for Saddle Stitched Booklets.
Below illustrations demonstrates the correct method of embossing artwork placement for the Perfect Binding Booklet, which requires folding and gluing on the spine.
As for packaging and gift boxes, the left side embossing artwork shows a wrong placement, while the right-sided ones are a correct way of placement.
Fonts
Do take note that when font sizes are too small, it may turn out that the embossing quality of the wordings will rather be stamped as a whole block. Hence, by using Arial Fonts types as standard, the minimal size of embossed words will be 11.0 pts, including any wordings within logos, images, etc.
Lines
For lines, there will be a minimum requirement of 1.0 pts for line thickness in order to ensure the embossing quality is perfect. If there are multiple lines to be embossed, do make sure that there is at least a 2.0mm distance between each line. It is highly advised that you are not to use Embossing as Outlines because all printing and finishing will require a minimal range of tolerance of at least +/- 0.25mm. It may turn out to worsen your print quality if there is any slight misregistration issue.

Dots
Very similarly to fonts and lines, Dots will also have a minimum requirement of 2.0pts size and above. Shall there be multiple dots to be embossed, please ensure that there is a distance of at least 1.0mm between each dot. Other than dots, Comma (,), Full Stops (.), Colon (:), Semi-Colon (;), Apostrophe (‘), Quotation Marks (“) and etc shall also play the same rule.
Quality Tolerance
All embossed jobs shall require tolerance of image registration of approximately 0.25mm.
We hope this article can guide you well for your Embossing and Debossing Printing Online! If you find this article useful, feel free to subscribe and sign up on printokabrunei.com as a member. We have more member benefits than you can expect. Discounts, free shipping promotions, and a huge variety of products are available online!
Read More: The basics and methods of Embossing and Debossing.







 Contact us